Tuesday, January 18, 2011
There are two programs to scan ABAP program
- RS_ABAP_SOURCE_SCAN
- RPR_ABAP_SOURCE_SCAN
The layout is used to arrange the UI elementss within the parent container. The node ROOTUIELEMENTCONTAINER is the root UI element and all the UI elements within a view are children of this root container. It is of TransparentContainer type and has initially assigned to it the FlowLayout layout.
If you want to watch demo, You can search in SDN or click here. |

To start running BSP applications first you need to configure FQDN (Fully Qualified Domain Name). This will enable you to run BSP application from http://yourcomputername.domain:8000/sap/bc/bsp/sap/XXX/startpage.htm If you do not wish to set FQDN you can use http://localhost:8000/sap/bc/bsp/sap/XXX/startpage.htm .
In the GUI status of the selection screen set by the system, the application toolbar contains five inactive pushbuttons, to which the function codes FC01 to FC05 are assigned. This statement activates the pushbutton of the function code FC0n, whereby a value between 1 and 5 must be entered for n.
To enable use of the pushbuttons, the statement TABLES must be used to declare an interface work area of the structure SSCRFIELDS from the ABAP Dictionary.
To activate pushbuttons on the selection screen, Please follow the sample program.
To enable use of the pushbuttons, the statement TABLES must be used to declare an interface work area of the structure SSCRFIELDS from the ABAP Dictionary.
To activate pushbuttons on the selection screen, Please follow the sample program.
REPORT  ztest_notepad.
"This declaration must be there.
TABLES: sscrfields.

SELECTION-SCREEN BEGIN OF BLOCK block1 WITH FRAME.
PARAMETERS: p1(10),
            p2(10).
SELECTION-SCREEN SKIP.
SELECTION-SCREEN END OF BLOCK block1.
"Add button to application toolbar
SELECTION-SCREEN FUNCTION KEY 1.  "Will have a function code of 'FC01'

INITIALIZATION.
  "Add displayed text string to buttons
  MOVE 'Application button' TO sscrfields-functxt_01.

*AT SELECTION-SCREEN.
AT SELECTION-SCREEN.

  IF sscrfields-ucomm = 'FC01'.
    BREAK-POINT.
  ENDIF.
Here are the steps to follow to get LOGO into SAP Easy Access screen.
- Goto T.code SMW0
- Select Binary data for webRFC application
- Click on Find button
- Click on Create button
- Import the image to the ZLOGO(Logo)
- Save in to Package ZABC
- Now goto SM30 t.code.
- Enter Name SSM_CUST and click on Maintain button
- At START_IMAGE, give the name as ZLOGO(capital letters)
- Save
There are three types of OSS notes.
|
SAP Notes SAP Notes give you instructions on how to remove known errors from SAP Systems. They include a description of the symptoms, the cause of the error, and the SAP Release and Support Package level in which the error occurs.Depending on the type of error, an SAP Note may also include:
OSS notes are online documents published by SAP in their web site http://service.sap.com, aimed to take care of the following:
|
Steps to configure OSS for SAP Note assistant
|
Steps to apply SAP note
|
This generic program is used to download PA and PY infotype data to presentation server.
Steps in the program
Steps in the program
- Get file directory using method cl_gui_frontend_services=>directory_browse.
- Create Dynamic table
- Generate records header by fulling header description using DDIF_FIELDINFO_GET funtion module.
- Extract data from Database
- Download data using GUI_DOWNLOAD function module by passing table with TAB delimited columns.
The below sample programs are used to show PDF on the selection in the docking container. Basically calling program gets the called program output from spool , converts to PDF, display PDF on the selection screen using docking container.
Table maintenance dialog(Generator) is used to maintain customizing data. We can create, change and delete customizing data with these maintenance dialogs. We can also use maintenance dialogs for customer database table and maintenance views. How do we create Table maintenance generator?There are two steps
|
Thursday, January 13, 2011
Steps to follow to edit Table entries using SE16N transaction code
- Go to transaction SE16N and enter table you want to edit.
- In the command field enter '&SAP_EDIT' & press ENTER. SAP editing function is activated.
- Enter selection criteria and click on F8 button.
- Now you can change/delete existing record or create new record.
- SAVE.
Tuesday, January 11, 2011
You can not see SAP Symbols or SAP Icons in Print Preview. Those can be seen when you print hard copy.
Wednesday, January 5, 2011
Contributor
- Easin Muttaqi, SAP Technical Consultant
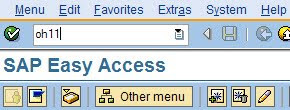
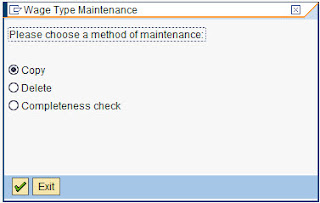
1.Go To Transaction: OH11
Path: IMG > Personnel Management > Personnel Administration > Payroll Data > Basic pay > Wagetypes > Create wage type Catalog
2. Enter Country code, Wage type group and select Model/Dialouge wage type MS40 and key in custome wage type code and its description.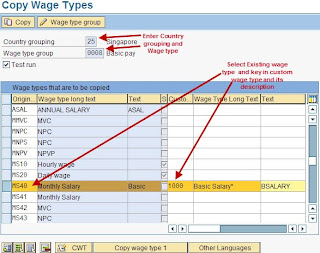
3. Click on COPY Icon and make sure Test Run check box is ticked so that before doing actual run we do test run to check any descripencies.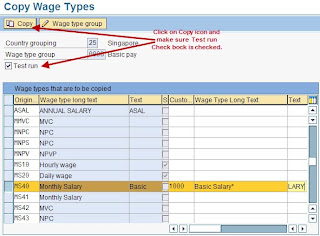
4. Below tables are updated once we do TEST RUN.
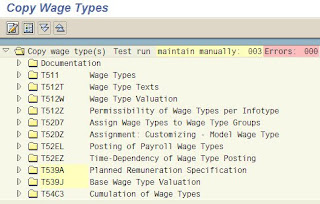
5. Remove TEST RUN Check box and click on COPY Icon for actuall run.

Updated Tables after actuall run

6. Check wage type text along with maintain validity dates.
PATH: IMG > Personnel Management > Personnel Administration > Payroll Data > Basic Pay > Wage Types > Check Wage type text

7. Check Wage type permitted to Wage Type Group
PATH: IMG > Personnel Management > Personnel Administration > Payroll Data > Basic Pay > Wage Types > Check entry permissibility per infotype

8. Maintain wage type permissibilies for PS and ESG
PATH: IMG > Personnel Management > Personnel Administration > Payroll Data > Basic Pay > Wage Types > Define Wage Type Permissibility for each PS and ESG


9. Maintain Wage type Characsticists
Path: IMG > Personnel Management > Personnel Administration > Payroll Data > Basic pay > Wagetypes > Create wage type Catalog

2. Enter Country code, Wage type group and select Model/Dialouge wage type MS40 and key in custome wage type code and its description.

3. Click on COPY Icon and make sure Test Run check box is ticked so that before doing actual run we do test run to check any descripencies.

4. Below tables are updated once we do TEST RUN.

5. Remove TEST RUN Check box and click on COPY Icon for actuall run.

Updated Tables after actuall run

6. Check wage type text along with maintain validity dates.
PATH: IMG > Personnel Management > Personnel Administration > Payroll Data > Basic Pay > Wage Types > Check Wage type text

7. Check Wage type permitted to Wage Type Group
PATH: IMG > Personnel Management > Personnel Administration > Payroll Data > Basic Pay > Wage Types > Check entry permissibility per infotype

8. Maintain wage type permissibilies for PS and ESG
PATH: IMG > Personnel Management > Personnel Administration > Payroll Data > Basic Pay > Wage Types > Define Wage Type Permissibility for each PS and ESG


9. Maintain Wage type Characsticists
PATH: IMG > Personnel Management > Personnel Administration > Payroll Data > Basic Pay > Wage Types > Check Wage type characteristics


10. Go To TCode: SM30 enter table V_512w_0 and maintain respective PCs / Cumulation and evaluation classes.


10. Go To TCode: SM30 enter table V_512w_0 and maintain respective PCs / Cumulation and evaluation classes.


11. Define posting Assign wage type to symbolic account.
PATH : IMG > Payroll > Singapore > Reporting for posting payroll results to accounting > Activities in HR System > Maintaining wage types > Define posting characteristics of wage types


First method.
- Go to SE71 transaction.
- Click on Utilities menu -> Activate Debugger.
- Go to SE38 transaction.
- Run RSTXDBUG program.
- Use RSRDEBUG standard program
- Check the link - Remote ABAP debugging
Tuesday, January 4, 2011
We create one SORT button in application toolbar. Highlight the column by clicking the header to find what column to sort by and press SORT button to sort table control values.


